WORDPRESS HACKS
How to Setup WP Locally without Hosting
- Choose a Local Development Environment
Select a local development environment that suits your needs. Some popular options include XAMPP, WampServer, MAMP, and Local by Flywheel. These tools provide a local server environment to run WordPress on your computer.
- Download and Install the Local Development Environment
Go to the official website of your chosen local development environment and download the appropriate version for your operating system. Follow the installation instructions provided by the tool to set it up on your computer.
- Create a Database
Access the control panel of your local development environment and navigate to the database management section. Create a new database for your WordPress installation. Take note of the database name, username, password, and host as you’ll need them during the WordPress installation process.
- Download WordPress
- Configure WordPress
Inside the WordPress folder, locate the “wp-config-sample.php” file and rename it to “wp-config.php”. Open the “wp-config.php” file in a text editor.
Look for the following lines in the file:
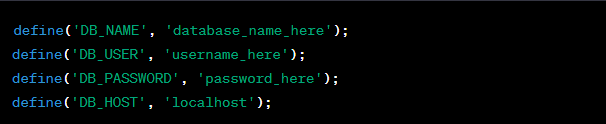
Replace the placeholder values with your database information:
DB_NAME: Replace with the name of the database you created.
DB_USER: Replace with the username of your database.
DB_PASSWORD: Replace with the password for the database user.
DB_HOST: Keep it as ‘localhost’ unless your local development environment specifies a different host.
Move WordPress Files:
Move the entire WordPress folder to the web server root directory of your local development environment. The location can vary depending on the tool you’re using. For example, in XAMPP, the root directory is typically “htdocs” or “www”.
- Install WordPress
Open your web browser and navigate to “http://localhost” or “http://localhost:port” (replace “port” with the port number specified by your local development environment). You should see the WordPress installation page. Select the desired language and click on the “Let’s go!” button.
Enter the database information you used in the wp-config.php file and click on the “Submit” button. WordPress will attempt to connect to the database.
If the connection is successful, click on the “Run the installation” button. Fill in the required information, such as site title, username, password, and email address. Click on the “Install WordPress” button.
- Access Your Local WordPress Site
After the installation is complete, you’ll be redirected to the WordPress login page. Enter your username and password to access the WordPress dashboard.
Congratulations! You have successfully set up WordPress locally on your computer. You can now start building and customizing your website offline.